A/B Testing
The A/B test tool enables you to test different ad monetization strategies on the ad unit level. You have the flexibility to split the traffic add ad units to the test at any time and remove an individual ad unit without closing the entire test.
You can access this feature through multiple pathways. From the main menu, located on the left side of the screen under Analysis, you can directly reach it. Alternatively, you can navigate there by accessing the A/B Testing tab within an Application or using quick actions within a Waterfall in a Location. Furthermore, launching this feature is also possible from the placement or waterfall listing button, providing users with various convenient options for access.
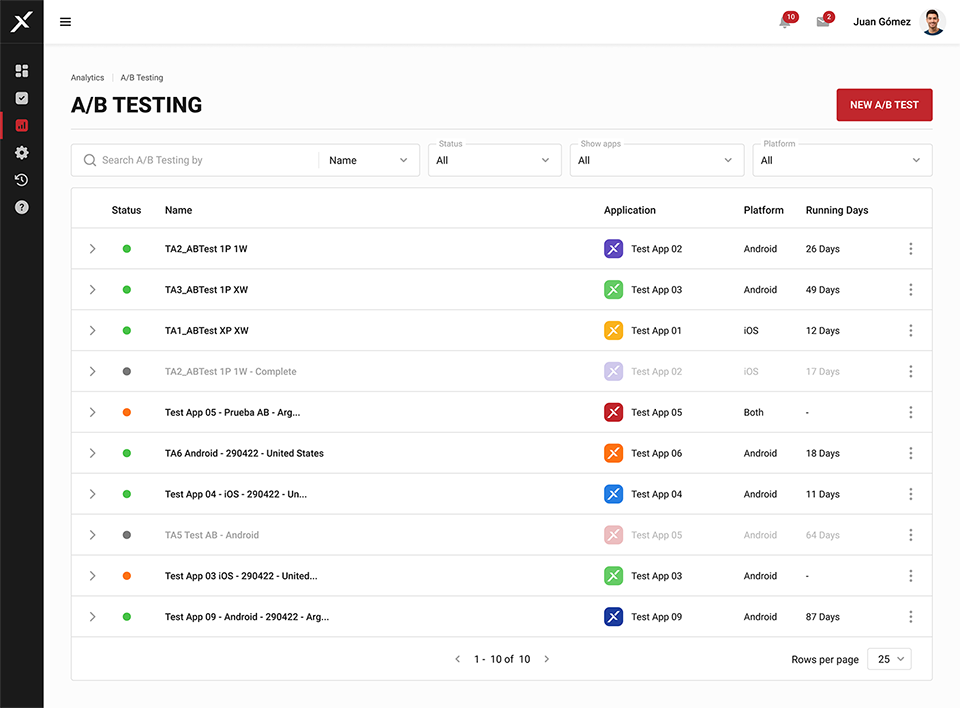
In it, you’ll find a list of every A/B Test conducted, with its identifying name, the app and platform in which it’s being run, and its status (Pending, Running or Finished). Each item can be expanded to see more details:
- Placements: Those that are part of the test.
- Waterfalls: Those that are being tested.
- A/B Variation: Number of variations (there can be 1 or 2).
- Running days: How long the test has been running.
- Segments: Those that are part of the test.
- Description: A break-down of the experiment.
1. Create New A/B Testing
In the list view, at the top right, click the New A/B Test button.
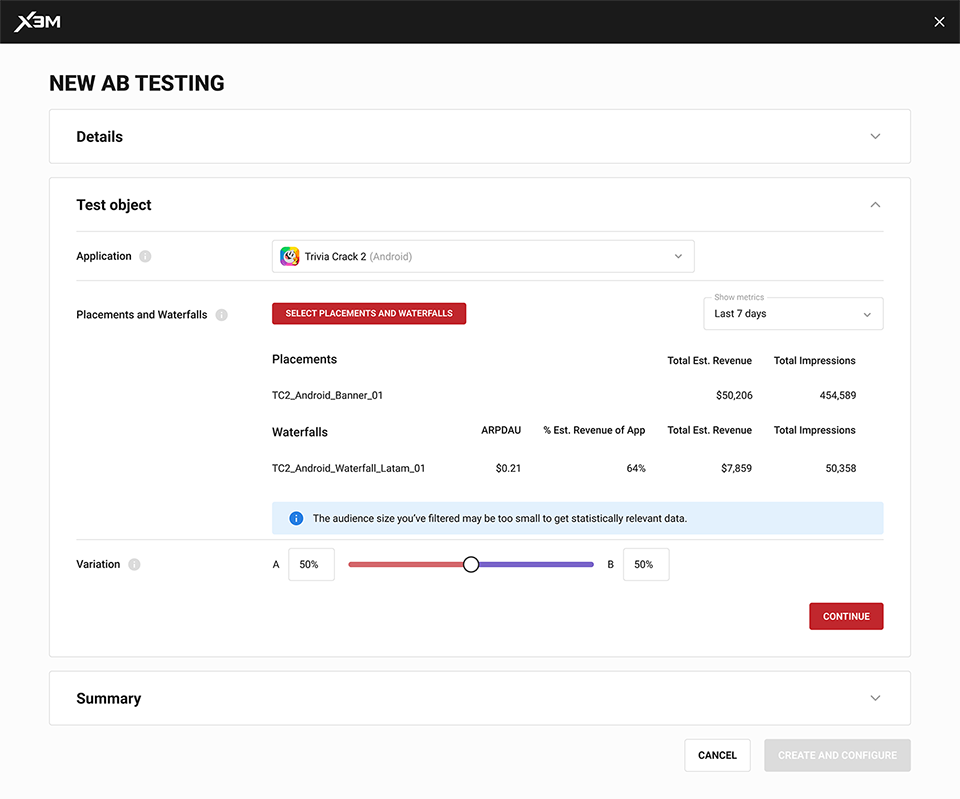
- First of all, decide a name and a description for your test.
-
Then, select the app you’ll run it on in the dropdown menu.
-
Once you do you’ll see two tables showing your available placements and waterfalls and their performance in the selected time period.
-
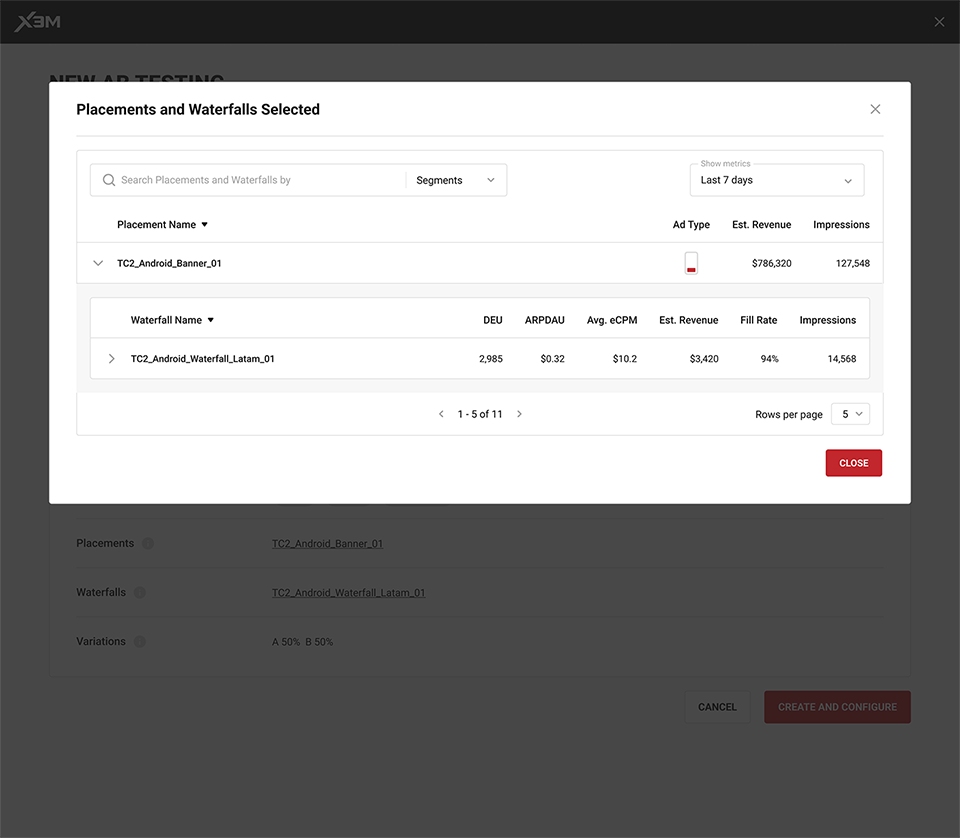
Click the Select Placements and Waterfalls button to pick which ones you’d like to test. You can search by name or by the segments they include. Once again, you’ll see the key metrics (for the time frame you select up top) to help you make your decision.
-
With the sideways arrow next to each placement, you can see all the waterfalls that refer to it and make your selection.
-
A warning message will let you know if your selection doesn’t have the statistical significance to run a test. In that case, you must go back and add more placements and waterfalls.
-
Next, decide how many variations you’ll test: one (A/B) or two ( A/B/C). Decide the share of traffic each will get using the slider or entering the percentage. A is always the control group.
-
Finally, you’ll see a summary of your selections. You can click on each field to see more details and go back to change them if necessary.
-
Your A/B Test is now Pending.
2. Configure
To set up the variant(s) for testing, start by editing the details of the B (and C) variant when the a/b is pending. Here are the changes you can make:
At the Placement Level:
Once you select the type of A/B test you'll conduct and create it, the system will automatically take you there for editing:
- Variant A will represent the current configuration.
- For variants B and C, you can edit the name, activate Fast First Impression, and buffering. By activating buffering, you can enable additional editing options: Lazy Load, buffer size, and priority. Scrolling further down, you'll find the waterfalls you've added, followed by the FFI (Fast First Impression) instances section: you can add instances, select current ones, and delete them as needed.
At the Waterfall Level:
Once you select the type of A/B test you'll conduct and create it, the system will automatically take you there for editing:
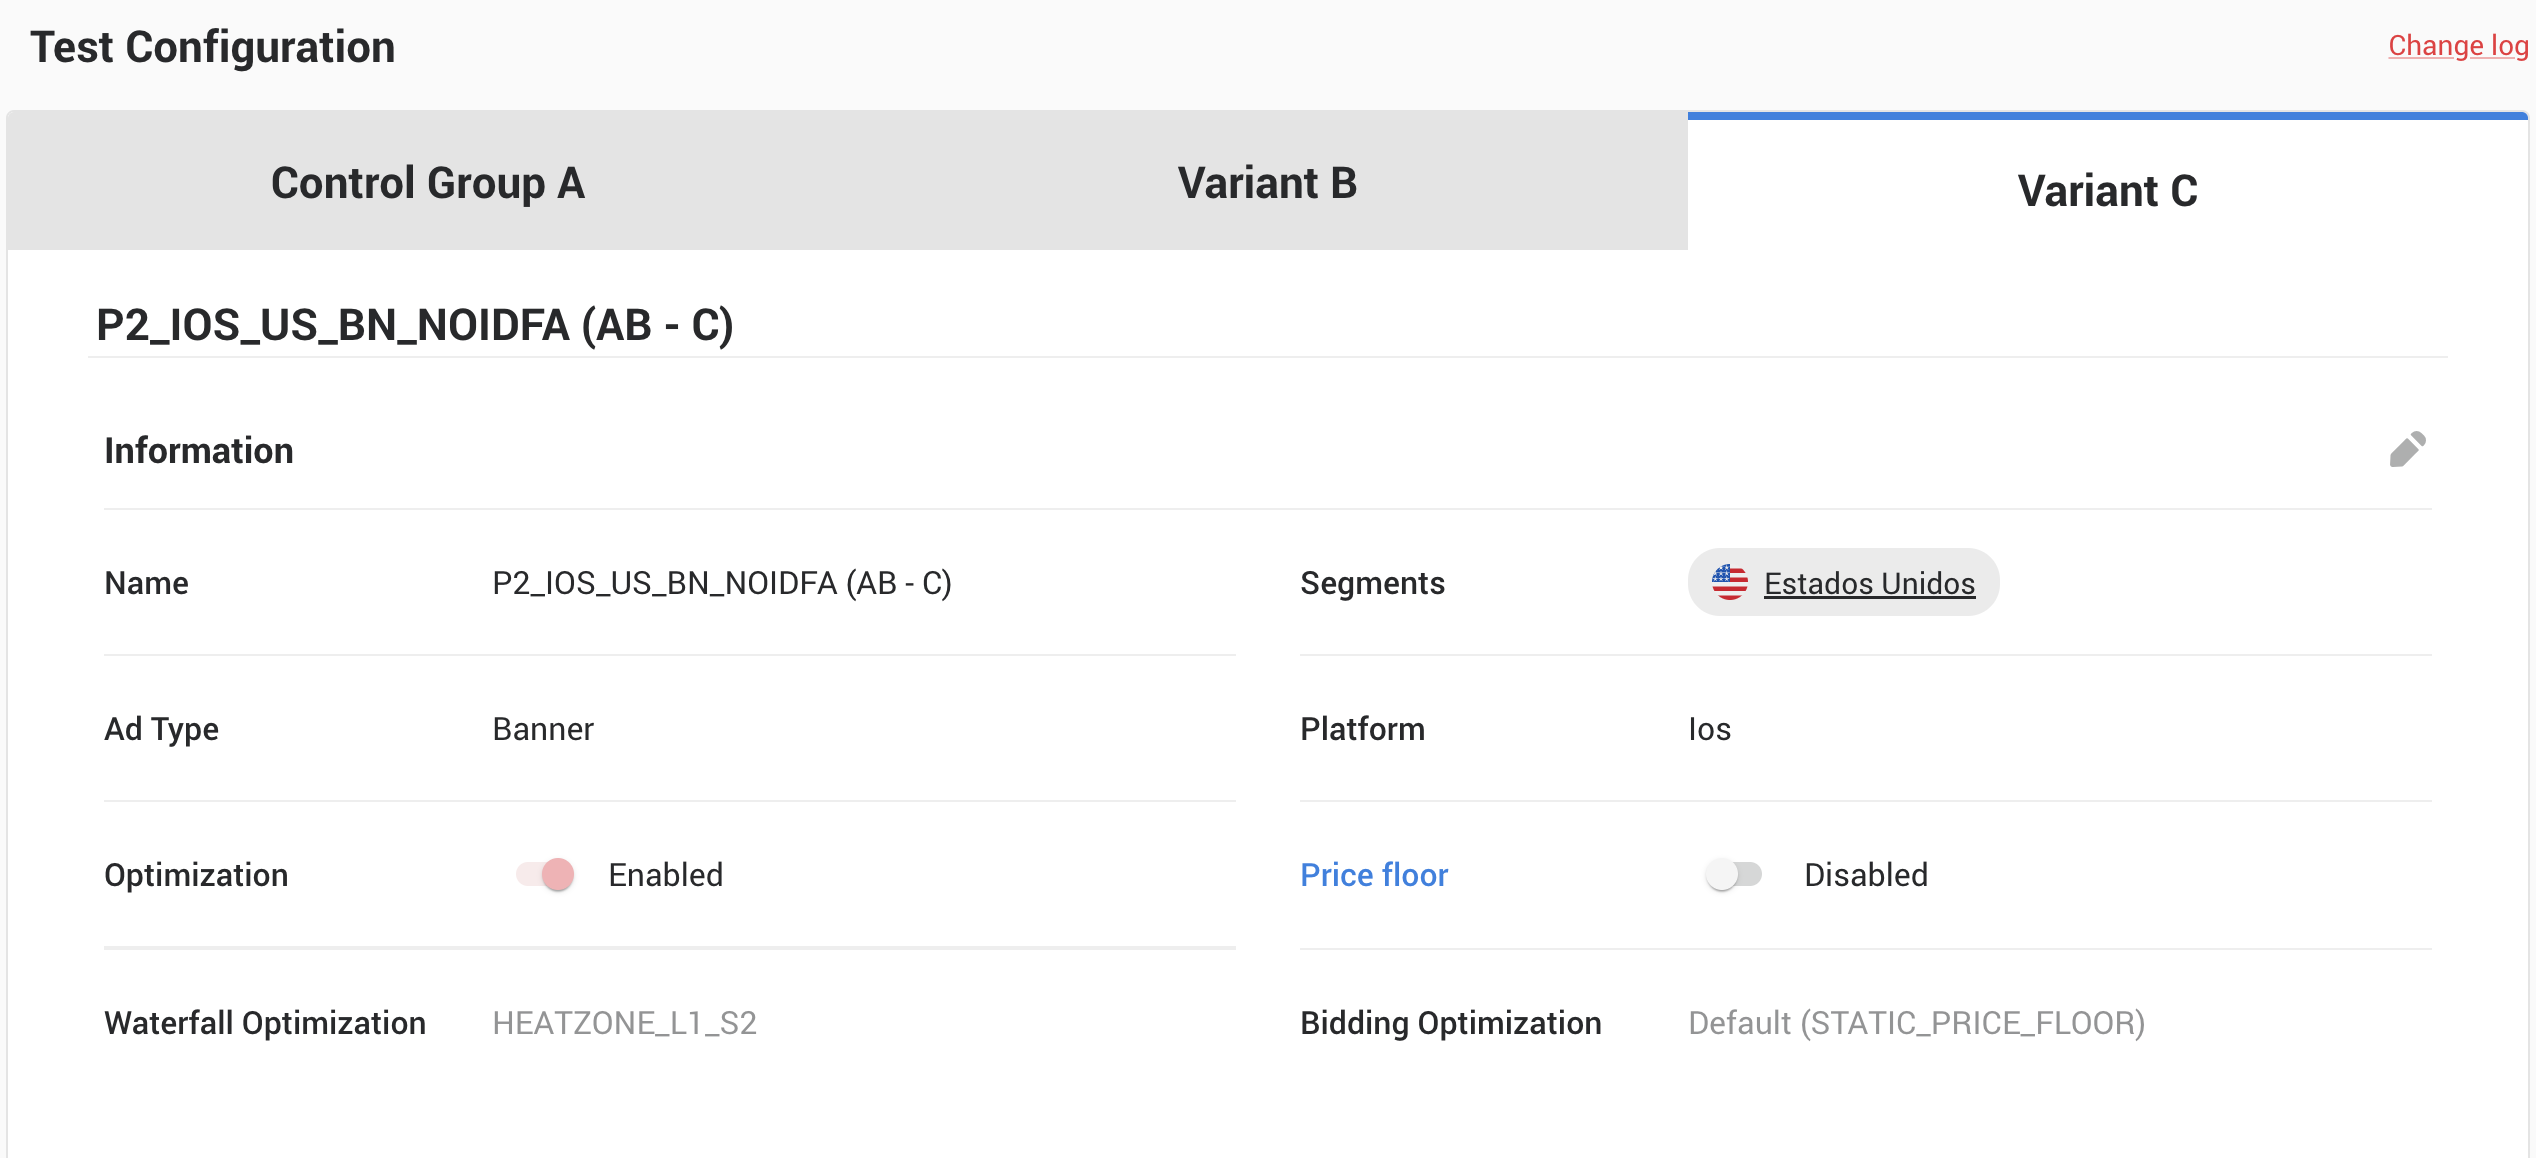
When you create an A/B testing for waterfalls, you can edit test B and/or C:
- Name: You can edit the name of the test variants. Optimization: Activate or deactivate Optimization and choose between Waterfall Optimization, Bidding Optimization, and set the price floor.
You can also add bidding and non-bidding instances:
- Bidding Instances: You can select, enable, disable, or remove them. Additionally, you can add new bidding instances.
- Non-Bidding Instances: Similar to bidding instances, you can select, enable, disable, remove, or add new non-bidding instances.
Furthermore, you can filter instances by skippables, dormants, or fixed attributes. Within the instances list, you can modify the call type and priority settings as needed.
Skippable: These instances can be skipped when the probability of buying an ad opportunity is low. Fixed: Instances of this type will be included regardless. Dormant: By default, these instances are skipped, but they can be included if the chances of buying are higher.
Click on a placement to see all the waterfalls involved, and click on a waterfall to see all the instances it contains. Every change you make will be highlighted in light blue or light violet, to make the comparison easier. E.g:
To the right, near the top, there’s a Change Log link. Click on it to see a summary of every variation you created.
You can save your progress and keep working on this configuration while the test is still pending.
Are you ready to begin? Press the Start button. Your A/B Test is now Running.
3. Check
To check up on an A/B Test, go to the list and click on the test name or the eye icon in the three dots menu.
Alternatively, in the Waterfall section, click on the AB icon next to the items on the list that are currently part of a test.
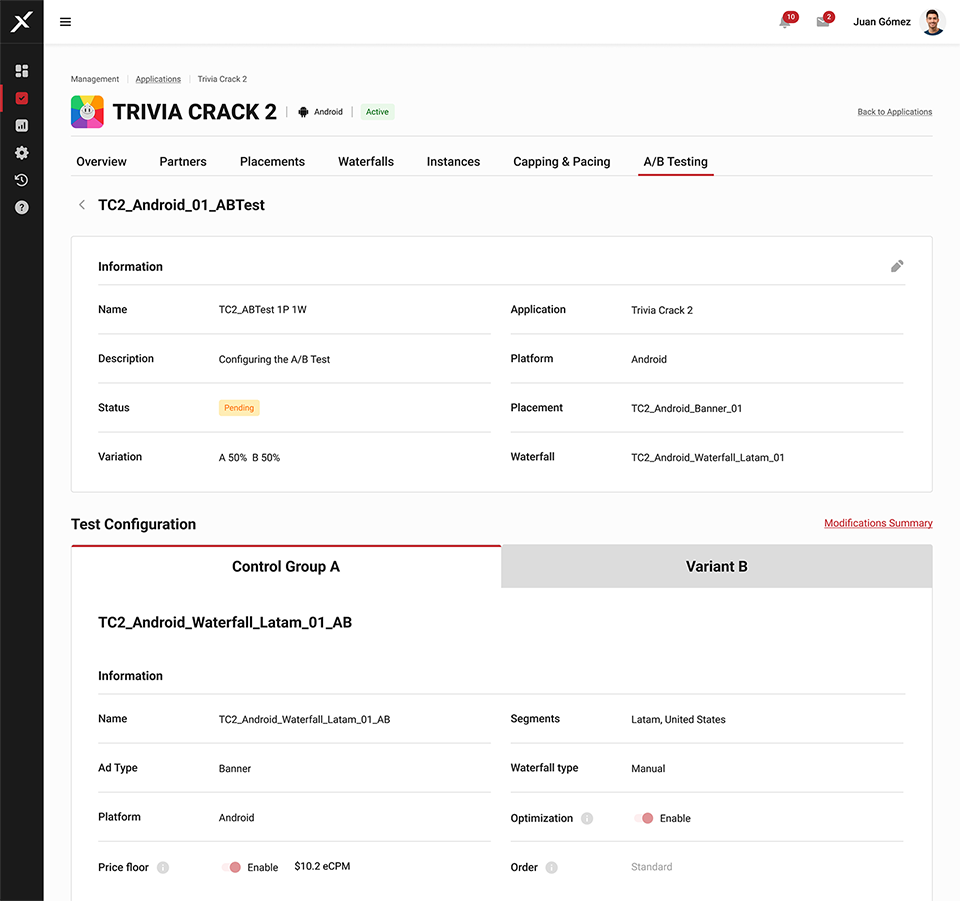
You’ll find, firstly, the test’s general information, out of which you can only edit the Name and Description.
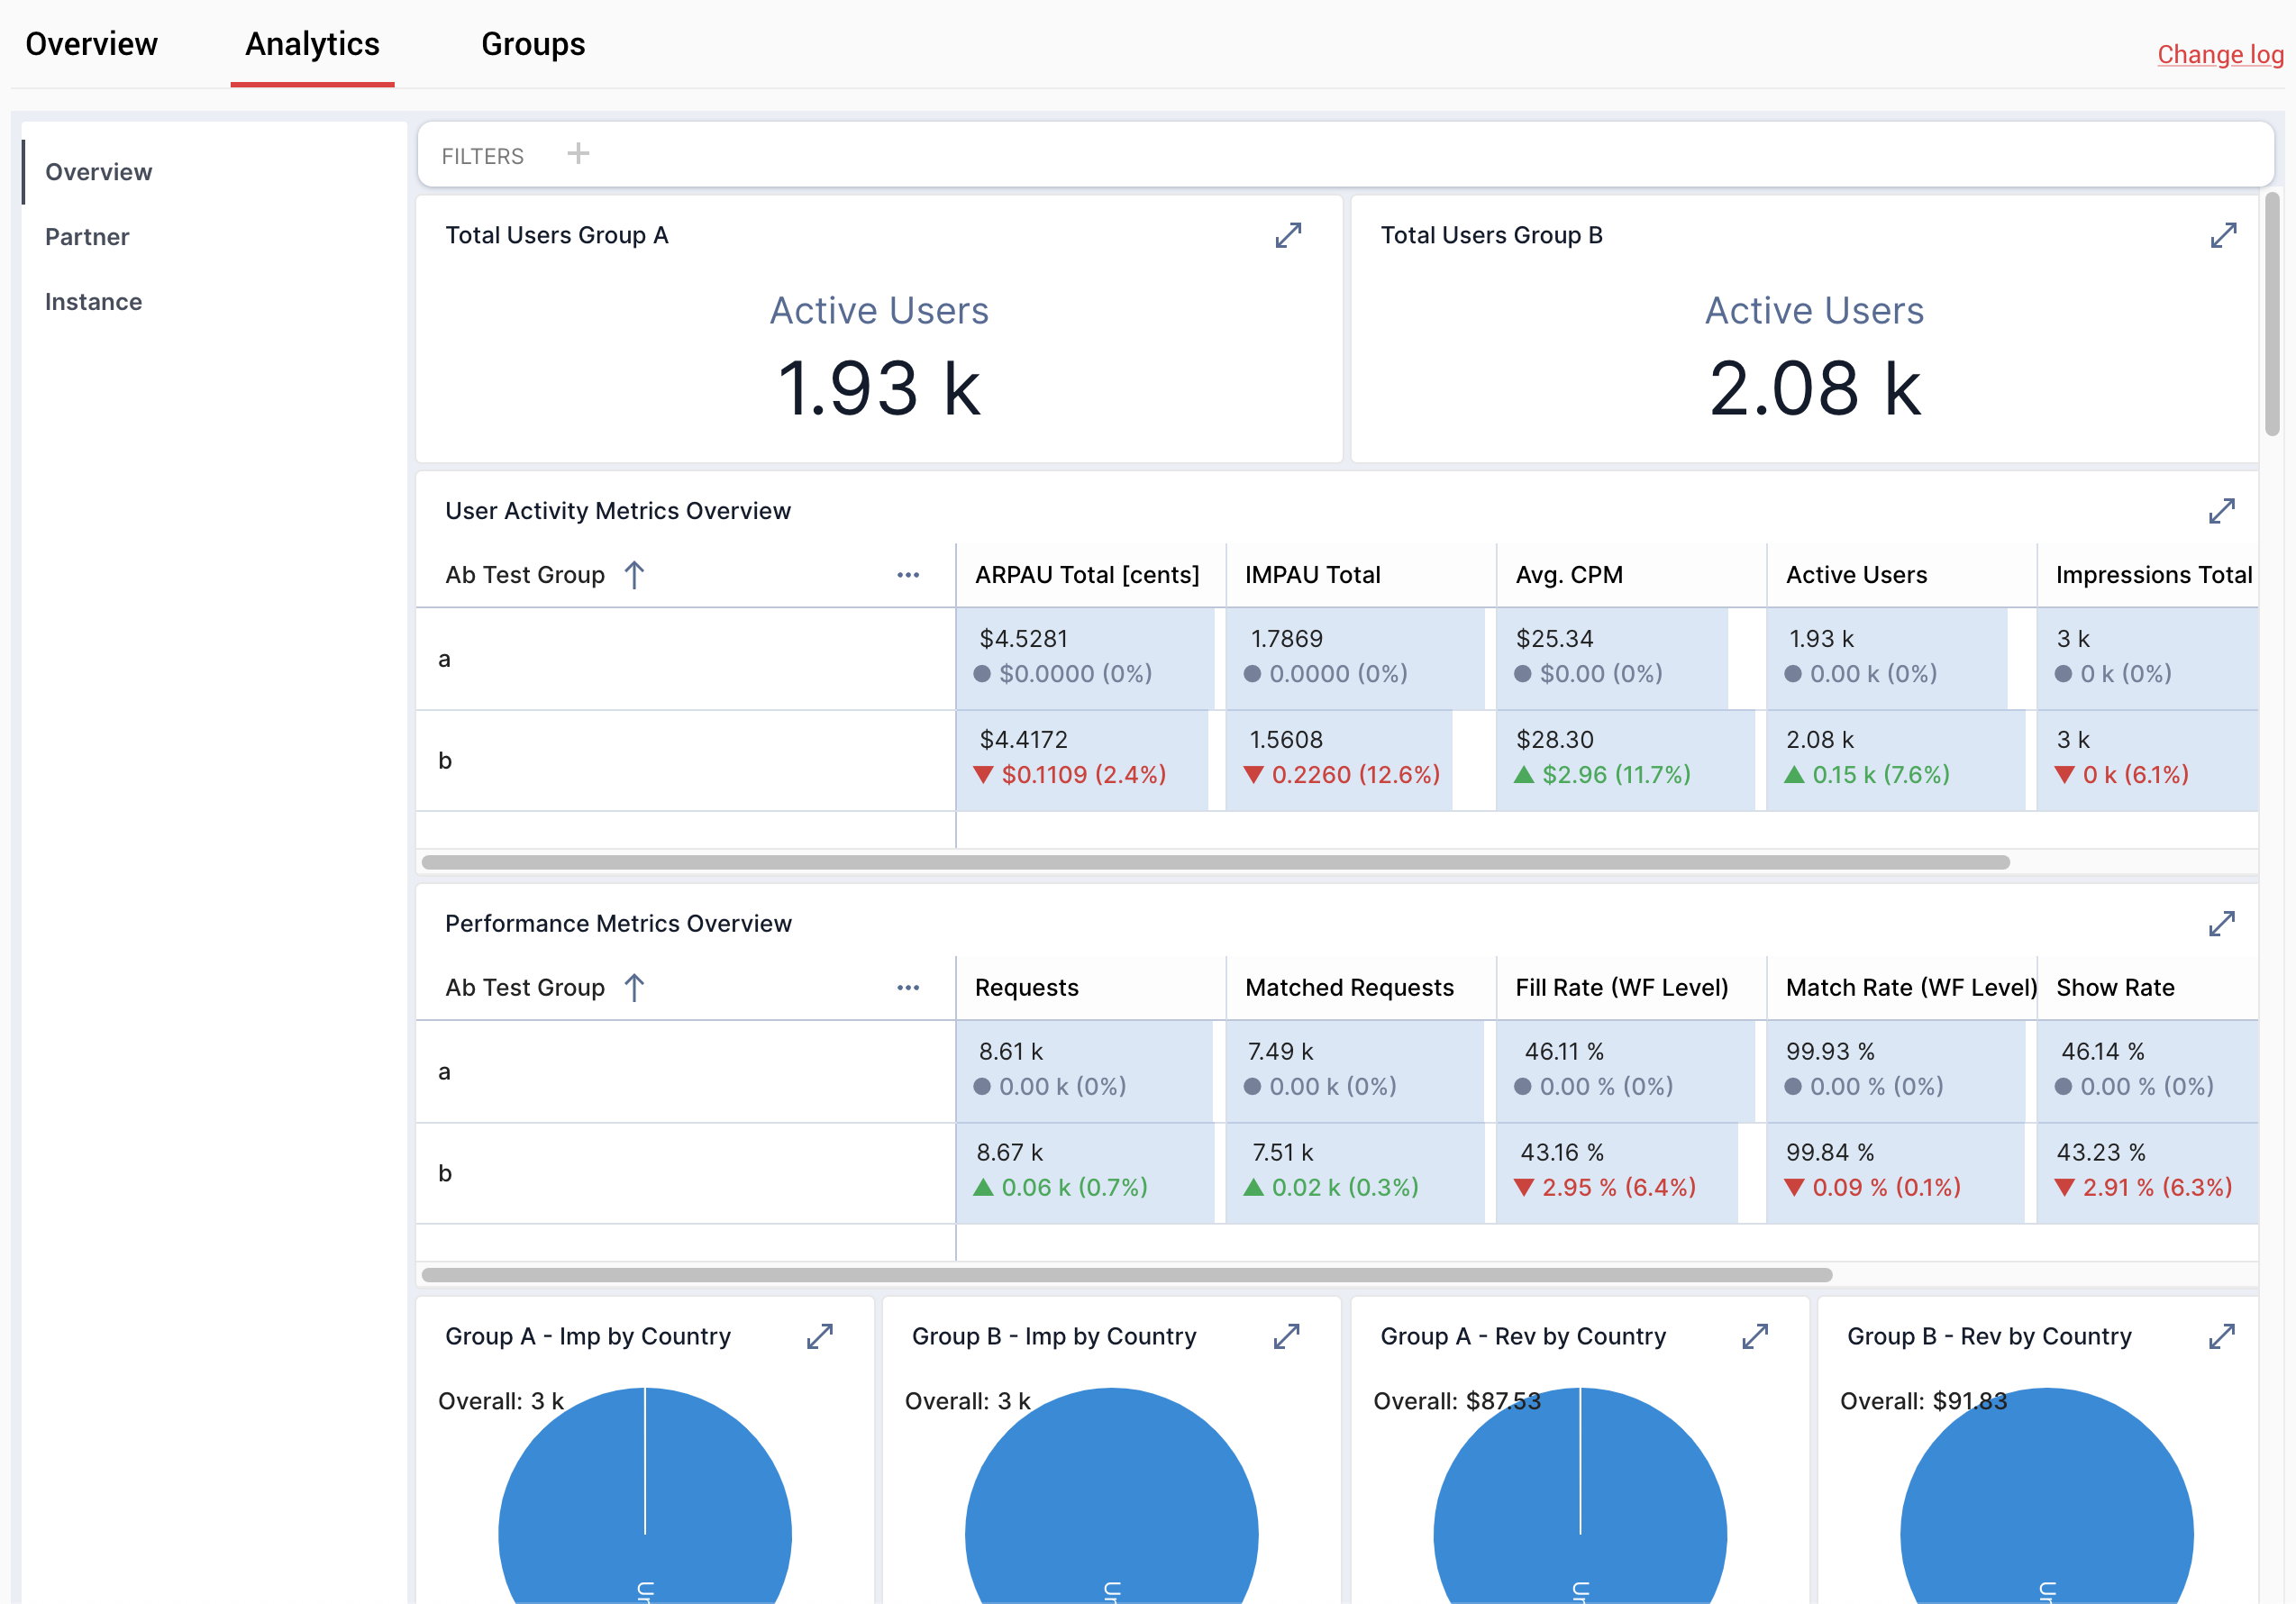
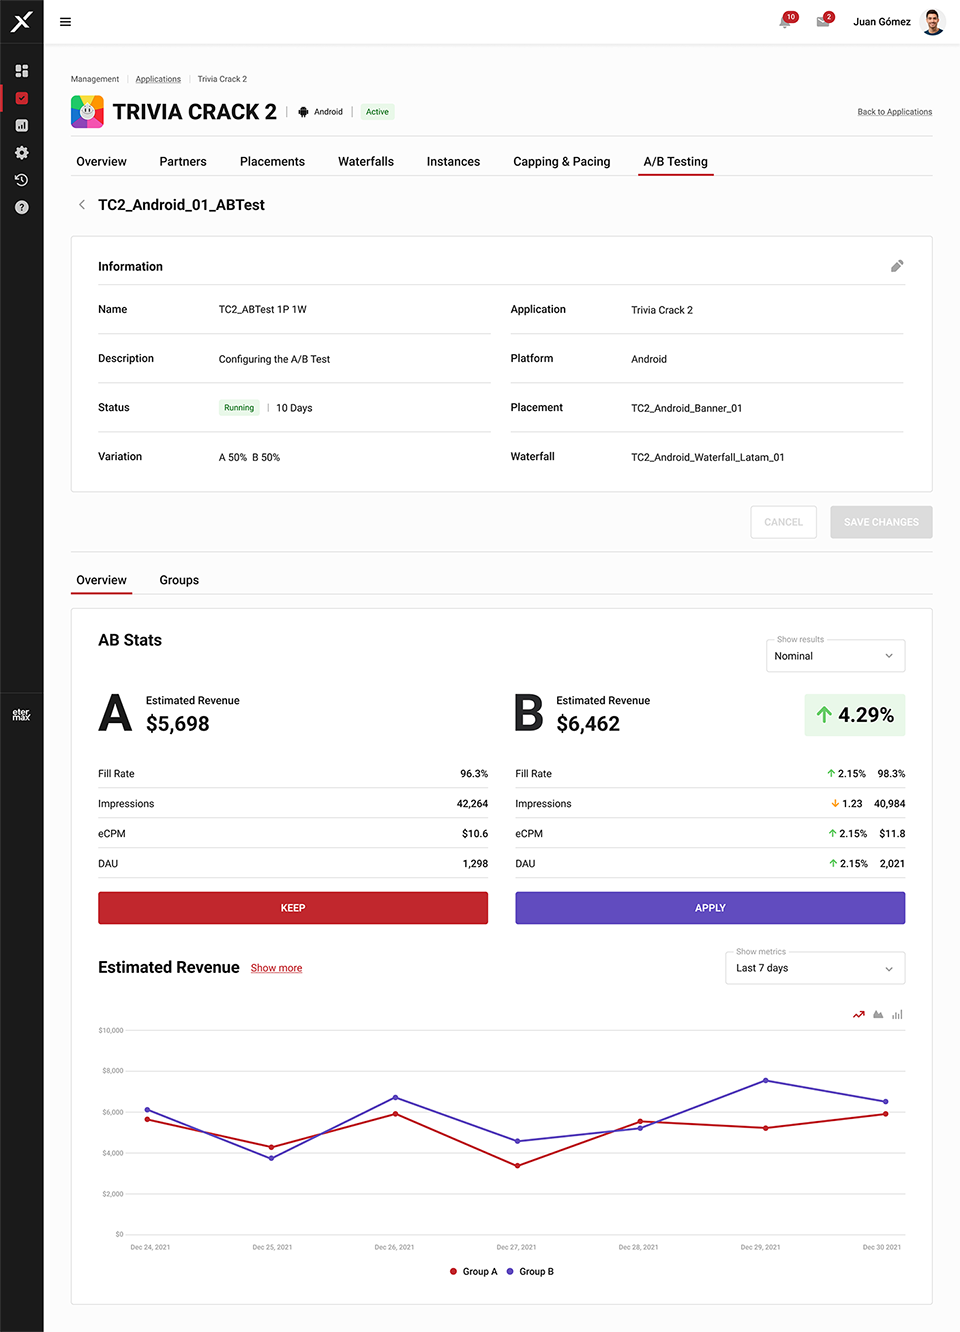
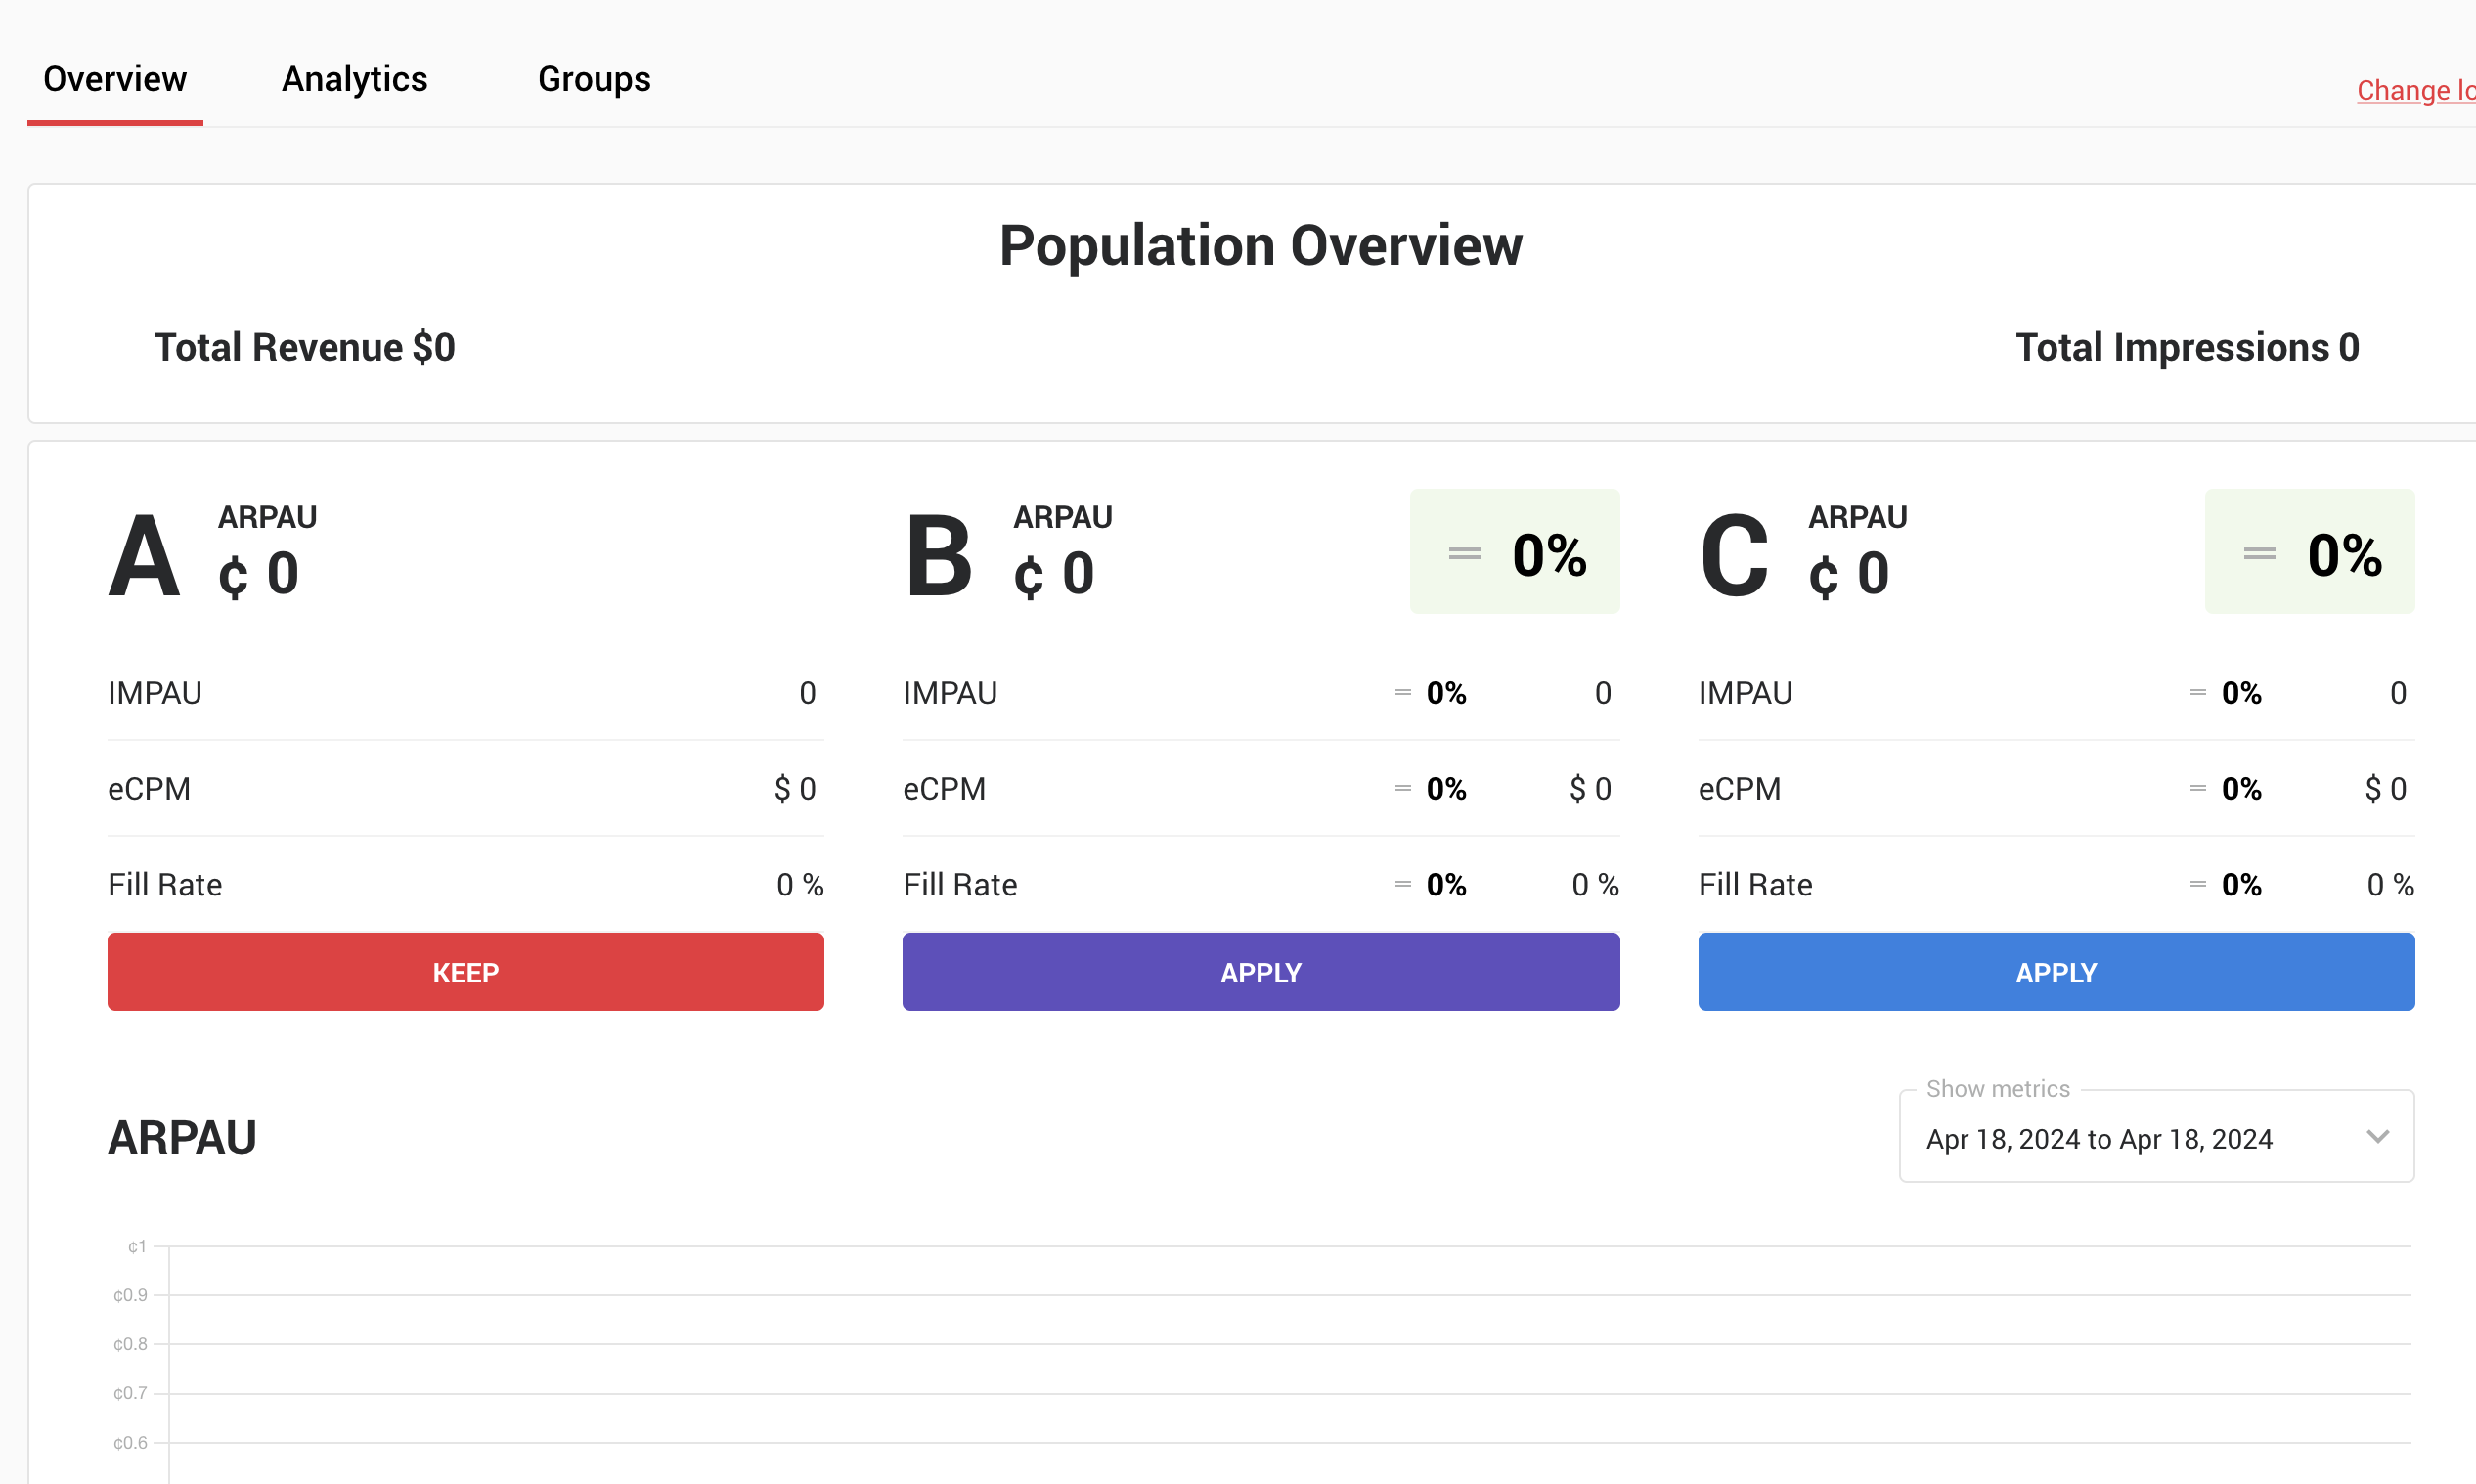
Below, there’s an Overview tab contrasting the performance of each variant, plus the comparative results as a percentage. At the bottom of the page you’ll find a graph comparing the Estimated Revenue for a certain time period. There’s a Show More option that will lead you to a complete Performance Report.
If this information is enough for you to make a decision, you can end the test right here. Click the Keep button to maintain the A configuration or click Apply to change it for the B or C variations.
Do you need more details? You’ll find them on the Groups tab. The differences between them are highlighted in blue. At this stage, you can’t edit the configuration.
4. Finish
As we explained in the previous section, in order to finish an A/B Test that’s running you must access it and click the keep button to maintain the A configuration or click Apply to change it for the B or C variations.
If you choose B or C, the new configuration will overwrite the previous one and create new elements. For example, if a waterfall applies to several placements but you only change the configuration for one of those placements, it will now have a separate waterfall.
The test status will now be Finished, but you can still see it on the list. Use the three dot menu to study the results further (Check), duplicate the test (Clone) or Delete it.